Why Are Ceramic Bearings So Expensive?
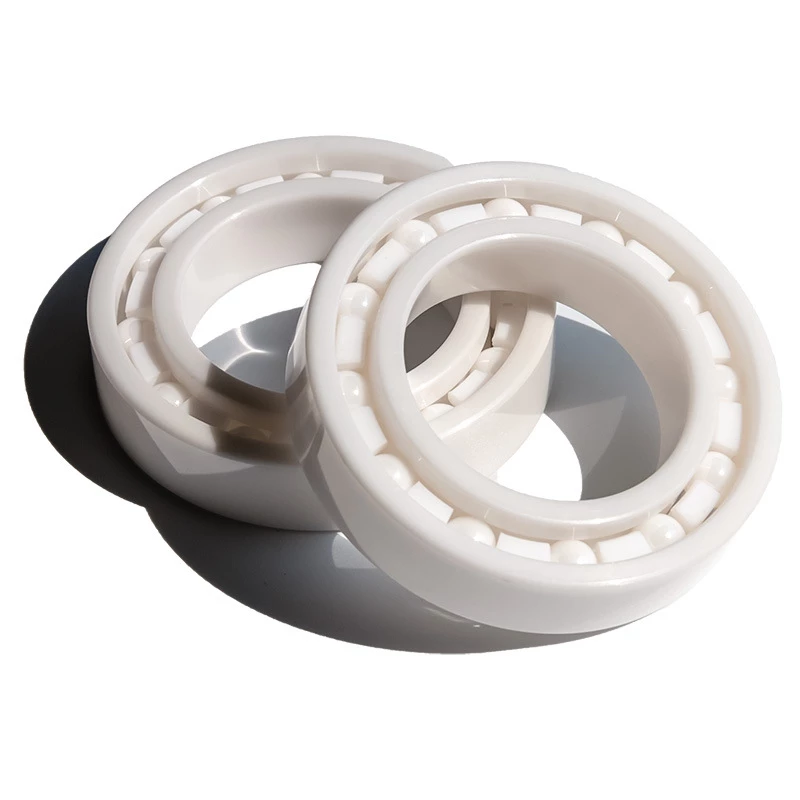
Ceramic bearings are a type of bearing that is made from ceramic materials, such as silicon nitride or zirconia. These bearings are known for their high performance and durability, but they also come with a high price tag. In this article, we will explore the reasons why ceramic bearings are so expensive and why they are worth the investment for certain applications.
First and foremost, the manufacturing process of ceramic bearings is more complex and labor-intensive compared to traditional steel bearings. Ceramic materials are more difficult to work with, and the manufacturing process requires specialized equipment and skilled labor. This increases the cost of production, which is reflected in the final price of the bearing.
Ceramic bearings also require more precise manufacturing tolerances than steel bearings. This is because ceramic materials have a lower thermal expansion coefficient and a higher modulus of elasticity, which means that they are more sensitive to manufacturing variations. As a result, the manufacturing process for ceramic bearings is more critical and requires greater attention to detail, which again, drives up the cost of production.
Another factor that contributes to the high cost of ceramic bearings is the raw materials used to make them. Ceramic materials are more expensive than steel, which is a commonly used material for traditional bearings. The cost of the raw materials used in ceramic bearings is passed on to the consumer, resulting in higher prices for the final product.
Despite the high cost, ceramic bearings offer several advantages over traditional steel bearings. One of the most significant advantages is their high performance. Ceramic bearings have a lower coefficient of friction, which means they require less energy to rotate. This results in less wear and tear on the bearing, and ultimately, a longer lifespan. Additionally, ceramic bearings can operate at higher speeds and temperatures than steel bearings, making them ideal for high-performance applications such as motorsports and aerospace.
Ceramic bearings are also more corrosion-resistant than steel bearings, making them well-suited for applications in harsh environments. They are also non-magnetic, which makes them suitable for use in electronic equipment and medical devices where magnetic interference is a concern.
In conclusion, ceramic bearings are more expensive than traditional steel bearings due to the complexity of the manufacturing process, the precision required, and the cost of raw materials. However, the high performance, durability, and resistance to corrosion make them well worth the investment for certain applications, such as high-performance motorsports and aerospace, and harsh environments like marine and food processing. Ultimately, the cost of ceramic bearings is a small price to pay for the benefits they offer in terms of performance and longevity.
Frequently Asked Questions
What is the ceramic coating?
Ceramic coating is a liquid polymer that is applied to the exterior of a vehicle. It forms a chemical bond with the vehicle’s factory paint, creating a layer of protection. This layer of protection helps protect the vehicle from scratches, dirt, UV rays, and other environmental contaminants. It also helps to reduce the amount of time and effort needed to keep the vehicle looking clean and shiny.
What is a ceramic tint?
Ceramic tint is a type of window tint that is made from ceramic particles. It is designed to block out the sun’s heat and UV rays while still allowing light to pass through. It is also more durable than traditional window tints and is less likely to fade or bubble over time.
How long does ceramic coating last?
Ceramic coating can last up to 5 years, depending on the type of coating and how well it is maintained.
What is ceramic?
Ceramic is a hard, brittle material made from non-metallic minerals, such as clay, that has been fired at high temperatures. Ceramics are used in a variety of applications, including pottery, tiles, and cookware.
How much does ceramic coating cost?
The cost of ceramic coating can vary depending on the size of the vehicle and the type of coating you choose. Generally, ceramic coating can range from $500 to $2,500.
How much is a ceramic tint?
The cost of ceramic tint varies depending on the size and type of vehicle, as well as the type of tint you choose. Generally, ceramic tints can cost anywhere from $100 to $400.
What does ceramic coating do?
Ceramic coating is a liquid polymer that is applied to the exterior of a vehicle. It forms a chemical bond with the vehicle’s factory paint, creating a layer of protection. This layer of protection helps to protect the vehicle from environmental contaminants such as bird droppings, tree sap, and acid rain. It also helps to reduce the effects of UV rays, which can cause fading and oxidation. Additionally, ceramic coating can help to reduce the visibility of minor scratches and swirl marks.
How to clean ceramic tiles?
1. Sweep or vacuum the floor to remove any dirt and debris.
2. Mix a solution of warm water and mild dish soap.
3. Dip a mop into the solution and wring it out until it is only damp.
4. Mop the floor in a circular motion, making sure to get into the corners and edges.
5. Rinse the mop in clean water and wring it out.
6. Mop the floor again with clean water to remove any soap residue.
7. Dry the floor with a clean towel or mop.”
How to paint ceramic tiles?
1. Clean the tile with mild detergent and water. Rinse and dry the tile with a soft cloth.
2. Sand the tile with fine-grit sandpaper to create a rough surface for the paint to adhere to.
3. Apply a coat of primer to the tile with a paintbrush. Allow the primer to dry completely.
4. Paint the tile with ceramic paint. Use a small brush to get into the grout lines. Allow the paint to dry completely.
5. Apply a sealer to the tile to protect the paint. Allow the sealer to dry completely.
How to cut ceramic tiles?
1. Measure and mark the tile with a pencil.
2. Score the tile with a tile cutter or a glass cutter.
3. Place the tile on a flat surface and press down firmly on the scored line.
4. Use a tile nipper to cut away any excess material.
5. Use a wet saw to make any precise cuts.
6. Sand the edges of the tile with a sanding block or sandpaper.
How to drill holes in the ceramic pot?
1. Gather the necessary supplies. You will need a ceramic drill bit, a drill, a piece of scrap wood, and a clamp.
2. Place the ceramic pot on the scrap wood and secure it with the clamp.
3. Put on safety glasses and gloves.
4. Select the appropriate drill bit for the size of the hole you need.
5. Place the drill bit in the drill and tighten it.
6. Place the drill bit on the spot where you want to drill the hole.
7. Start the drill and slowly drill into the ceramic pot.
8. Stop drilling when you have reached the desired depth.
9. Remove the drill bit and clean up any debris.
10. Enjoy your newly drilled ceramic pot!
How to grease trailer bearings?
1. Jack up the trailer and place the jack stands under the frame.
2. Remove the wheel and tire from the trailer.
3. Remove the dust cap from the hub.
4. Remove the cotter pin and castle nut from the spindle.
5. Pull the hub off the spindle.
6. Clean the bearings and races with a rag and solvent.
7. Pack the bearings with high-temperature bearing grease.
8. Reinstall the hub onto the spindle and secure it with the castle nut and cotter pin.
9. Replace the dust cap.
10. Reinstall the wheel and tire.
11. Lower the trailer and remove the jack stands.
How to clean skateboard bearings?
1. Remove the wheels from the skateboard.
2. Place the wheels on a flat surface and use a screwdriver to remove the bearings from the wheels.
3. Place the bearings in a bowl of warm, soapy water and let them soak for 10-15 minutes.
4. Use a toothbrush to scrub the bearings clean.
5. Rinse the bearings with clean water and dry them with a clean cloth.
6. Place a few drops of oil on each bearing and spin them to spread the oil evenly.
7. Reassemble the wheels and bearings and reattach them to the skateboard.
How long do wheel bearings last?
Wheel bearings typically last between 70,000 and 100,000 miles, depending on the type of vehicle and driving conditions.
What are ball bearings?
Ball bearings are a type of rolling-element bearing that uses balls to maintain the separation between the bearing races. The purpose of a ball bearing is to reduce rotational friction and support radial and axial loads. It achieves this by using at least two races to contain the balls and transmit the loads through the balls.
How to clean bearings?
1. Remove the bearings from the skateboard.
2. Place the bearings in a bowl and cover them with rubbing alcohol.
3. Let the bearings soak for 10-15 minutes.
4. Remove the bearings from the bowl and use a toothbrush to scrub away any dirt or grime.
5. Rinse the bearings with warm water and dry them with a clean cloth.
6. Place a few drops of bearing lubricant on each bearing and spin them to spread the lubricant evenly.
7. Reinstall the bearings on the skateboard.
What are wheel bearings?
Wheel bearings are components that allow the wheel to rotate freely and smoothly. They are typically made up of steel balls or rollers that are held together by an inner and outer ring. The inner ring is connected to the axle, while the outer ring is connected to the wheel hub. Wheel bearings help to reduce friction between the wheel and axle, allowing the wheel to rotate with minimal resistance.
How much are wheel bearings?
The cost of wheel bearings can vary depending on the type of vehicle and the size of the wheel bearing. Generally, wheel bearings range in price from $20 to $200.
How to repack trailer bearings?
1. Jack up the trailer and support it with jack stands.
2. Remove the wheel and tire from the trailer.
3. Remove the grease cap from the hub and inspect the bearings.
4. Remove the cotter pin and castle nut from the hub.
5. Pull the hub off the spindle and remove the inner and outer bearing races.
6. Clean the hub and bearing races with a wire brush and solvent.
7. Pack the bearings with fresh grease.
8. Install the inner and outer bearing races.
9. Place the hub back onto the spindle and secure it with the castle nut and cotter pin.
10. Reinstall the wheel and tire.
11. Lower the trailer and remove the jack stands.
How much does it cost to fix wheel bearings?
The cost to replace wheel bearings can vary depending on the make and model of the vehicle, as well as the labor costs of the mechanic. Generally, the cost to replace wheel bearings can range from $150 to $400.
How to check for bad wheel bearings?
1. Listen for a humming, rumbling, or growling noise coming from the wheel area.
2. Check for excessive play in the wheel by jacking up the vehicle and grabbing the top and bottom of the tire and attempting to move it back and forth.
3. Check for uneven tire wear, which can be an indication of a bad wheel bearing.
4. Check for any signs of leaking grease or oil around the wheel bearing area.
5. Have a mechanic inspect the wheel bearings for any signs of wear or damage.
What are bearings on a car?
Bearings are components found in a car’s wheels, axles, and drivetrain. They are used to reduce friction and allow the parts to move freely. Bearings are typically made of metal and contain small metal balls that roll between two surfaces.
How long does it take to replace wheel bearings?
The amount of time it takes to replace wheel bearings depends on the type of vehicle and the complexity of the job. Generally, it can take anywhere from 1-4 hours to complete the job.
How to put bearings on wheels?
1. Place the wheel on a flat surface.
2. Place the bearing on the wheel, making sure that the bearing is centered and flush with the wheel.
3. Secure the bearing in place with a bearing press or a hammer and a block of wood.
4. Place the second bearing on the wheel, making sure that it is centered and flush with the wheel.
5. Secure the second bearing in place with a bearing press or a hammer and a block of wood.
6. Place the axle through the center of the bearings.
7. Secure the axle in place with a nut or a cotter pin.
What bearings for a skateboard?
Skateboard bearings are typically made of steel and come in a variety of sizes. The most common size is 8mm, but there are also 6mm, 7mm, and 9mm bearings available. The size of the bearing you need will depend on the size of your wheels.
How long does it take to change wheel bearings?
The amount of time it takes to change wheel bearings depends on the type of vehicle and the skill of the mechanic. Generally, it can take anywhere from 1-3 hours to complete the job.
What causes wheel bearings to go bad?
Wheel bearings can go bad due to a variety of reasons, including lack of lubrication, excessive heat, and water contamination. Other causes include improper installation, excessive load, and wear and tear due to age.
How are ball bearings made?
Ball bearings are typically made from steel, although other materials such as ceramic and plastic can also be used. The manufacturing process begins with the creation of the inner and outer rings, which are then machined to precise specifications. The balls are then placed between the two rings and held in place by a cage. The cage is usually made from a metal such as steel or brass. The entire assembly is then placed in a heat treatment process to harden the steel and ensure the longevity of the bearing. Finally, the bearing is lubricated and sealed to protect it from dirt and moisture.
What are the best skateboard bearings?
The best skateboard bearings depend on your budget and riding style. Some of the most popular brands include Bones, Bronson, Andale, and Independent. Bone bearings are known for their durability and speed, while Bronson bearings are known for their smoothness and affordability. Andale bearings are known for their precision and speed, while Independent bearings are known for their strength and reliability.
How to pack bearings on a trailer?
1. Start by cleaning the bearings and the hub. Use a wire brush to remove any dirt or debris.
2. Place the inner bearing on the hub and press it in with a bearing press.
3. Place the outer bearing on the hub and press it in with a bearing press.
4. Place the bearing seal on the hub and press it in with a bearing press.
5. Place the bearing spacer on the hub and press it in with a bearing press.
6. Place the bearing nut on the hub and tighten it with a wrench.
7. Place the bearing cap on the hub and tighten it with a wrench.
8. Place the wheel on the hub and tighten the lug nuts with a wrench.
9. Place the trailer on the ground and check the wheel for proper alignment.
10. Test the trailer by driving it around the block to make sure the bearings are properly packed.
How to check rear wheel bearings?
1. Jack up the rear of the vehicle and support it with jack stands.
2. Remove the wheel and tire from the vehicle.
3. Inspect the wheel bearing for any signs of wear or damage. Look for any cracks, rust, or other signs of damage.
4. Check the wheel bearing for any play or looseness. If there is any play, the bearing may need to be replaced.
5. Check the wheel bearing for any noise or vibration when it is rotated. If there is any noise or vibration, the bearing may need to be replaced.
6. Reinstall the wheel and tire and lower the vehicle.
How to fix wheel bearings?
1. Jack up the car and place it on jack stands.
2. Remove the wheel and tire.
3. Remove the brake caliper and rotor.
4. Unbolt the hub assembly from the spindle.
5. Remove the bearing and seal from the hub assembly.
6. Clean the hub assembly and inspect for any damage.
7. Install the new bearing and seal.
8. Reinstall the hub assembly onto the spindle.
9. Reinstall the rotor and brake caliper.
10. Reinstall the wheel and tire.
11. Lower the car and test drive.

